|
Open CASCADE Technology
6.7.1
|
|
|
Open CASCADE Technology
6.7.1
|
|
This file describes steps to build OCCT libraries from complete source package with CMake. CMake is free software that can create GNU Makefiles, KDevelop, XCode, and Visual Studio project files. Version 2.6 or above of CMake is required.
If you are building OCCT from bare sources (as in Git repository), or do some changes affecting CDL files, you need to use WOK to re-generate header files and build scripts / projects. See Using WOK for instructions.
Before building OCCT, you need to install required third-party libraries; see instructions for your platform in Building OCCT from sources.
The build directory is the one where intermediate files will be created (projects / makefiles, objects, binaries). Each configuration to be built should have its own build directory.
The install directory is the one where binaries will be installed after build, along with header files and resources required for OCCT use in applications. It is possible to install several configurations of OCCT (differentiated by platform, bitness, compiler, and build type) into the same directory.
It is recommended to separate build and install directories from OCCT source directory, for example:
   /user/home/occt/                           - sources
   /user/home/tmp/occt-build-vc10-x64-release - intermediate files
   /user/home/occt-install                    - installed binaries
Run CMake indicating path to OCCT sources ($CASROOT) and selected build directory.
It is recommended to use GUI tools provided by CMake: cmake-gui on Windows and Mac, ccmake or cmake-gui on Linux.
Specify the root folder of OCCT ($CASROOT, it contains CMakelists.txt file) by clicking Browse Source.
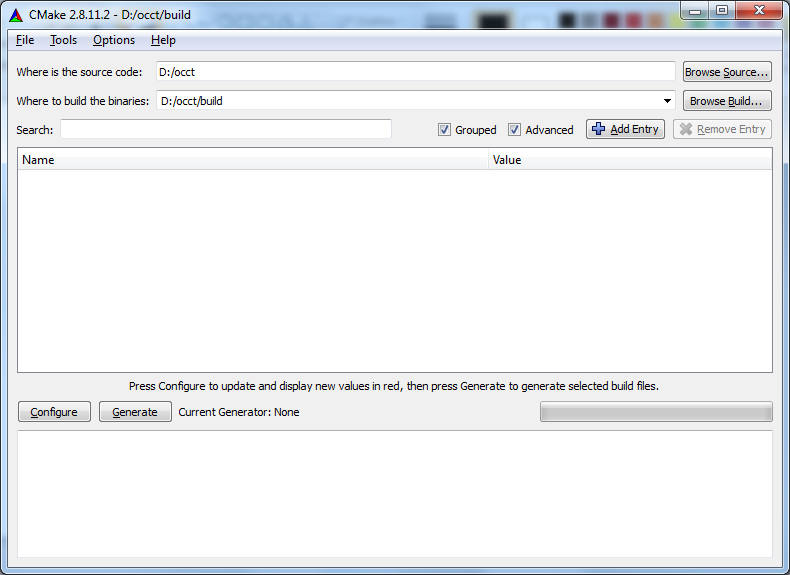
Specify location (build folder) for Cmake generated project files by clicking Browse Build. Each configuration of the project should be built in its own directory. When building multiple configurations it is recommended to compose name of build directories including system, bitness, compiler, and build type (e.g., d:/occt/build/win32-vc9-debug).
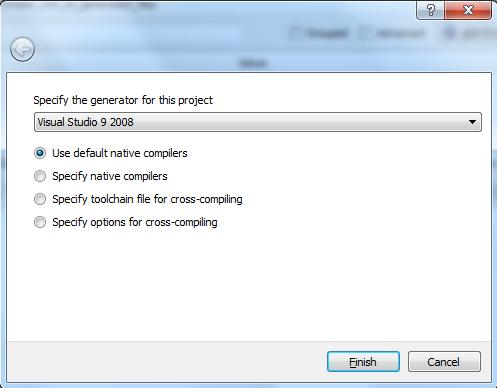
Configure opens the window with a drop-down list of generators supported by CMake project. Select the required generator (e.g., Visual Studio 2008) and click Finish.
In the console, change to the build directory and call ccmake with the path to the source directory of the project:
   > cd ~/occt/build/debug
   > ccmake ~/occt
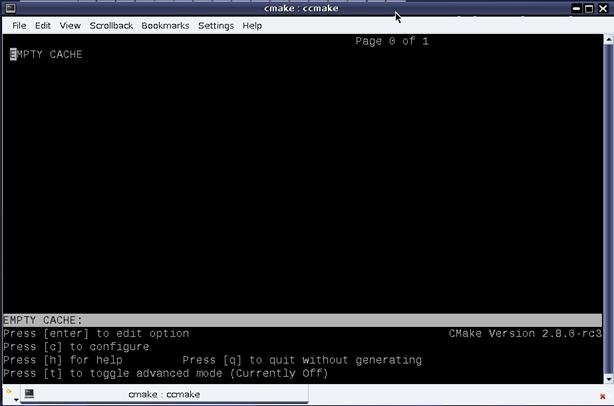
Press "c" to configure.
Use of cmake-gui is the same as described above for Windows.
Use cmake-gui (Applications -> CMake 2.8-10.app) to generate project files for the chosen build environment (e.g., XCode).
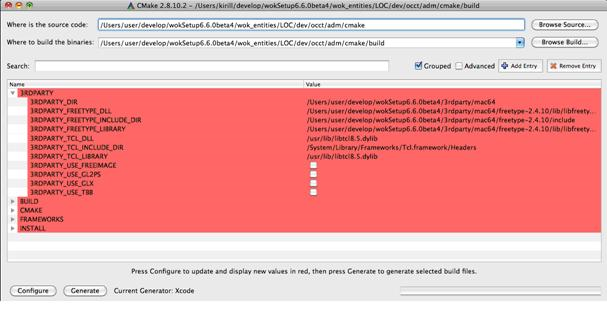
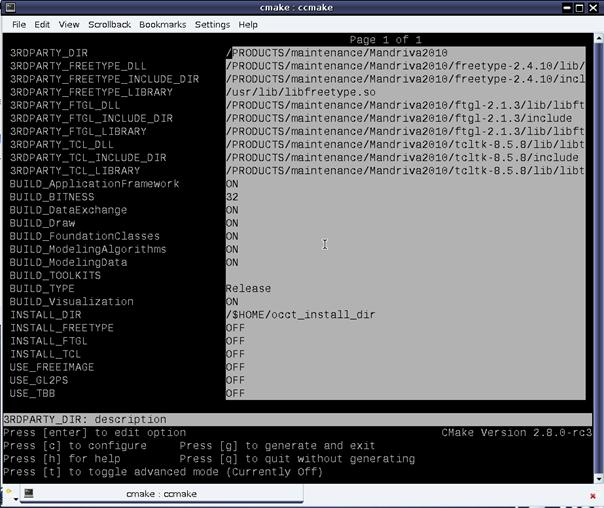
The error message which appears at the end of configuration process, informs you about the required variables which need to be defined. This error will appear until all required variables are defined correctly. Note: In cmake-gui there is "grouped" option, which groups variables with a common prefix.
The variables with "BUILD_" prefix allow specifying OCCT components and configuration to be built:
Check variables with "USE_" prefix (USE_FREEIMAGE, USE_GL2PS, USE_TBB, and USE_OPENCL) if you want to enable use of the corresponding optional 3rd-party library.
If you have 3rd-party libraries in a non-default location (e.g., on Windows, binaries downloaded from "http://www.opencascade.org/getocc/download/3rdparty/"), specify 3RDPARTY_DIR variable that points to the folders of 3rdparty libraries (some or all). At the next configuration step the 3rd-party libraries will be searched for in 3RDPARTY_DIR directory, and stored in 3RDPARTY_<LIBRARY>_DIR variables. The procedure expects to find binary and header files of each 3rd-party library in its own sub-directory, separated by sub-directories bin, lib, and include.
Press "Configure" ("c" key for ccmake).
The result of the 3rdparty product search will be recorded in the corresponding variables:
The search process is as follows:
If a variable of any level is not defined (empty or <variable name>-NOTFOUND) and the upper level variable is defined, the content of the non-defined variable will be searched for at the next configuration step. If search process in level 3 does not find the required files, it searches in default places also.
Note: the names of searched libraries and header files are hardcoded. Freetype search process tries to find ft2build.h file in 3RDPARTY_FREETYPE INCLUDE dir and after that adds "3RDPARTY_FREETYPE_INCLUDE /freetype2" path to common includes if it exists.
Important: If BUILD_CONFIGURATION variable is changed - at the next configuration 3RDPARTY_ variables will be replaced by the search process result, except for the 3RDPARTY_DIR variable.
Note: CMake will produce an error after the configuration step until all required variables are defined correctly. If the search result (include path, or library path, or dll path) does not meet your expectations - you can change 3RDPARTY_<PRODUCT>_DIR variable, clear (if they are not empty) 3RDPARTY_<PRODUCT>_DLL, 3RDPARTY_<PRODUCT>_INCLUDE_DIR and 3RDPARTY_<PRODUCT>_LIBRARY variables (or clear one of them) and run the configuration process again.
At this time the search will be performed in the new identified directory and the result will be recorded to empty variables (non-empty variables will not be replaced).
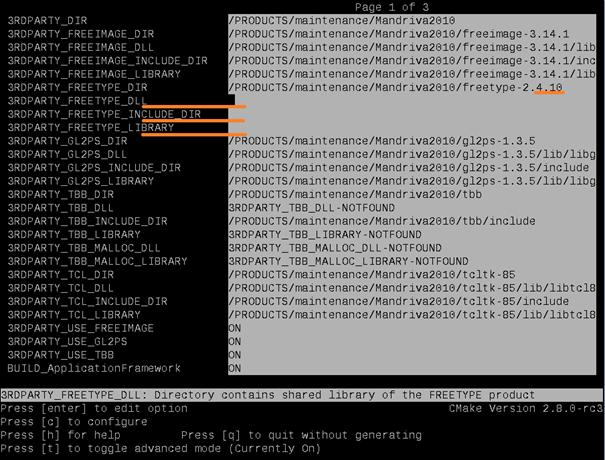
For example, (Linux case) 3RDPARTY_FREETYPE_DIR variable
/PRODUCTS/maintenance/Mandriva2010/freetype-2.3.7
can be changed to
/PRODUCTS/maintenance/Mandriva2010/freetype-2.4.10
and the related variables: 3RDPARTY_FREETYPE_DLL, 3RDPARTY_FREETYPE_INCLUDE_DIR and 3RDPARTY_FREETYPE_LIBRARY will be cleared.
During configuration process the cleaned variables will be filled with new found values.
Define in INSTALL_DIR variable the path where will be placed built OCCT files (libraries, executables and headers). If INSTALL_<PRODUCT> variable is checked - 3rd-party products will be copied to the install directory.
This will create makefiles or project files for your build system.
Click Generate button and wait until the generation process is finished. Then the project files will appear in the build folder (e.g., d:/occt/build/win32-vc9-release).
When the configuration is complete, start the generation process by pressing "g".
Click Generate button and wait until the generation process is finished. Then the project files will appear in the build folder (e.g., /Developer/occt/build/XCode).
The install folder contains bin, inc, lib and res folders and a script to run DRAWEXE (draw.bat or draw.sh). "bin" contains executables, DLL (Windows) style shared libraries and pdb-files in OCCT debug version,. "lib" contains the import parts of DLL libraries. "inc" contains header files. "res" contains all required source files for OCCT.
Go to the build folder, start the Visual Studio solution (OCCT.sln) and build it by clicking Build - Build Solution. When the building process finished, build the INSTALL project (by default the build solution process skips the building of the INSTALL project) to move the above files to INSTALL_DIR. For this in the solution explorer right click on the INSTALL project and select Project Only - Build Only INSTALL.
Change directory to binary dir and run make command
> make
To copy all libraries, executables and chosen 3rd-party libraries run "make" command with "install" argument
> make install
This command will move the above files to INSTALL_DIR.
Go to the build folder, start the XCode solution (OCCT.xcodeproj) and build it by clicking Build -> Build. Please notice that XCode may have worst responsibility to user actions due to sources processing at first start.
When the building process finished, build the INSTALL project (by default the build solution process skips the building of the INSTALL project) to move the above files to INSTALL_DIR. Notice that env.sh (configure PATH and DYLD_LIBRARY_PATH environment variables as well as Draw Harness extra variables) and draw.sh (to launch DRAWEXE) will be created in target directory.
 1.8.5
1.8.5