|
Open CASCADE Technology
6.7.1
|
|
|
Open CASCADE Technology
6.7.1
|
|
This document presents guidelines for building third-party products used by Open CASCADE Technology (OCCT) and samples on Windows platform. It is assumed that you are already familiar with MS Visual Studio / Visual C++.
You need to use the same version of MS Visual Studio for building all third-party products and OCCT itself, in order to receive a consistent set of run-time binaries.
The links for downloading the third-party products are available on the web site of OPEN CASCADE SAS at http://www.opencascade.org/getocc/require/. There are two types of third-party products used by OCCT:
It is recommended to create a separate new folder on your workstation, where you will unpack the downloaded archives of the third-party products, and where you will build these products (for example, c:\occ3rdparty).
Further in this document, this folder is referred to as 3rdparty.
Tcl/Tk is required for DRAW test harness. We recommend installing a binary distribution that can be downloaded from http://www.activestate.com/activetcl.
Go to "Free Downloads" and pick the version of the Install Wizard that matches your target platform – 32 bit (x86) or 64 bit (x64). The version of Visual Studio you use is irrelevant when choosing the Install Wizard.
Run the downloaded Install Wizard and install Tcl/Tk products :
Further in this document, this folder is referred to as tcltk.
FreeType is required for text display in a 3D viewer. You can download its sources from http://sourceforge.net/projects/freetype/files/
Build the freetype project.
As a result, you will get a freetype import library (.lib) in the freetype\obj\win32\vc20xx folder.
If you build FreeType for a 64 bit platform, select in the main menu Build - Configuration Manager and add x64 platform to the solution configuration by copying the settings from Win32 platform:
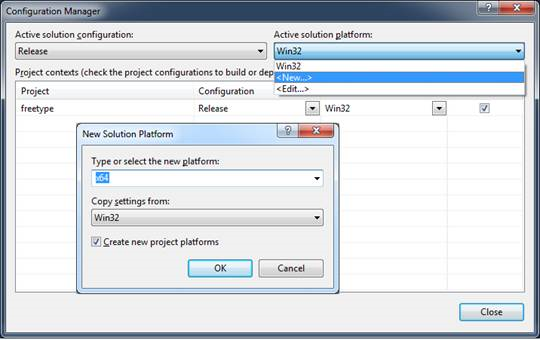
Update the value of the Output File for x64 configuration:
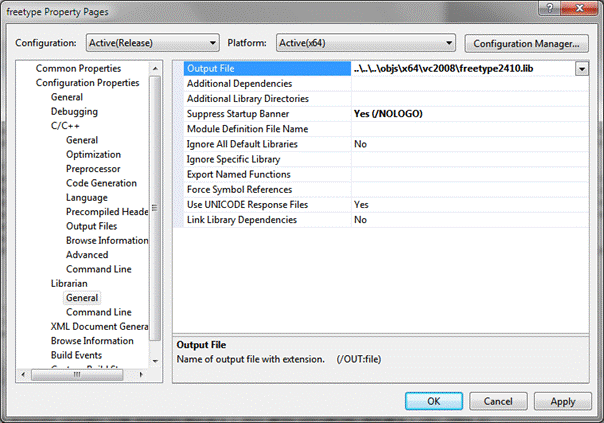
Build the freetype project.
As a result, you will obtain a 64 bit import library (.lib) file in the freetype\x64\vc20xx folder.
To build FreeType as a dynamic library (.dll) follow steps 6, 7 and 8 of this procedure.
Edit file freetype\include\freetype\config\ftoption.h:
in line 255, uncomment the definition of macro FT_EXPORT and change it as follows:
#define FT_EXPORT(x) __declspec(dllexport) x
Build the freetype project.
As a result, you will obtain the files of the import library (.lib) and the dynamic library (.dll) in folders freetype \objs\release or \objs\debug .
If you build for a 64 bit platform, follow step 5 of the procedure.
To facilitate the use of FreeType libraries in OCCT with minimal adjustment of build procedures, it is recommended to copy the include files and libraries of FreeType into a separate folder, named according to the pattern: freetype-compiler-bitness-building mode, where:
The include subfolder should be copied as is, while libraries should be renamed to freetype.lib and freetype.dll (suffixes removed) and placed to subdirectories lib *and *bin, respectively. If the Debug configuration is built, the Debug libraries should be put into subdirectories libd and bind.
This third-party product is installed with binaries from the archive that can be downloaded from http://threadingbuildingblocks.org/. Go to the Download page, find the release version you need (e.g. tbb30_018oss) and pick the archive for Windows platform.
Unpack the downloaded archive of TBB product into the 3rdparty folder.
Further in this document, this folder is referred to as tbb.
This third-party product should be built as a dynamically loadable library (dll file). You can download its sources from http://geuz.org/gl2ps/src/.
Unpack the downloaded archive of gl2ps product (e.g. gl2ps-1.3.5.tgz) into the 3rdparty folder.
As a result, you will get a folder named, for example, 3rdparty\gl2ps-1.3.5-source.
Rename it into gl2ps-platform-compiler-building mode, where
For example, gl2ps-win64-vc10-deb
Further in this document, this folder is referred to as gl2ps.
Edit the file gl2ps\CMakeLists.txt.
After line 113 in CMakeLists.txt:
set_target_properties(shared PROPERTIES COMPILE_FLAGS \"-DGL2PSDLL -DGL2PSDLL_EXPORTS\")
add the following line:
add_definitions(-D_USE_MATH_DEFINES)
Attention: If Cygwin was installed on your computer, make sure that there is no path to it in the PATH variable to avoid possible conflicts during the configuration.
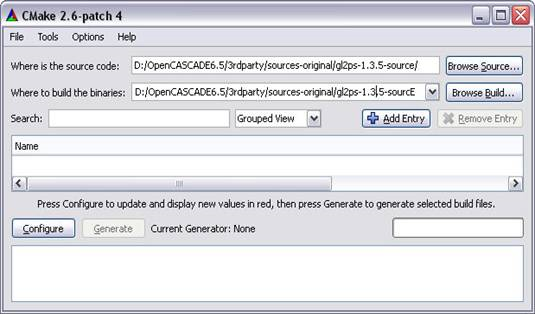
Launch CMake (cmake-gui.exe) using the Program menu.
In CMake:
Press Configure button.
Select the generator (the compiler and the target platform - 32 or 64 bit) in the pop-up window.
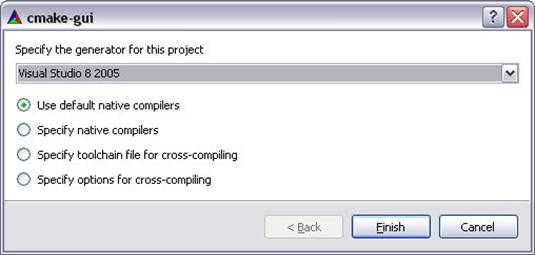
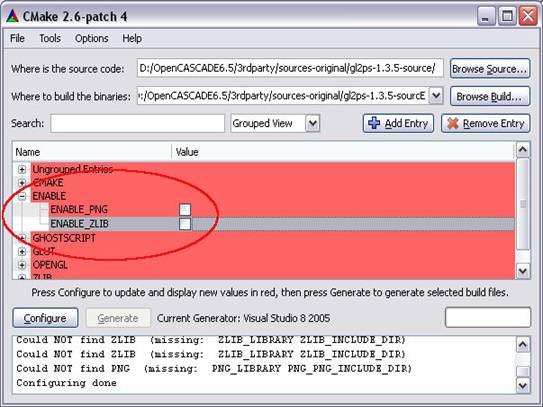
Press Finish button to return to the main CMake window. Expand the ENABLE group and uncheck ENABLE_PNG and ENABLE_ZLIB check boxes.
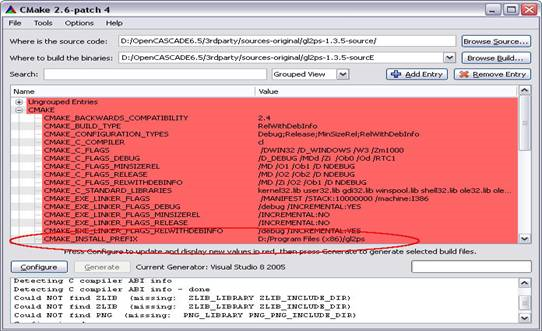
Expand the CMAKE group and define CMAKE_INSTALL_PREFIX which is the path where you want to install the build results, for example, c:\occ3rdparty\gl2ps-1.3.5.
As a result, you should have the installed gl2ps product in the CMAKE_INSTALL_PREFIX path.
This third-party product should be built as a dynamically loadable library (.dll file). You can download its sources from http://sourceforge.net/projects/freeimage/files/Source%20Distribution/
Unpack the downloaded archive of FreeImage product into 3rdparty folder.
As a result, you should have a folder named 3rdparty\FreeImage.
Rename it according to the rule: freeimage-platform-compiler-building mode, where
Further in this document, this folder is referred to as freeimage.
Open the solution file freeimage\FreeImage..sln* in your Visual Studio.
If you use a Visual Studio version higher than VC++ 2008, apply conversion of the workspace. Such conversion should be suggested automatically by Visual Studio.
Select a configuration to build.
Note:
If you want to build a debug version of FreeImage binaries then you need to rename the following files in FreeImage and FreeimagePlus projects:
Project -> Properties -> Configuration Properties -> Linker -> General -> Output File
FreeImage*d*.dll  to FreeImage.dll
FreeImagePlus*d*.dll to FreeImagePlus.dll
Project -> Properties -> Configuration Properties -> Linker -> Debugging-> Generate Program Database File
FreeImage*d*.pdb  to FreeImage.pdb
FreeImagePlus*d*.pdb to FreeImagePlus.pdb
Project -> Properties -> Configuration Properties -> Linker -> Advanced-Import Library
FreeImage*d*.lib  to FreeImage.lib
FreeImagePlus*d*.lib  to FreeImagePlus.lib
Project -> Properties -> Configuration Properties -> Build Events -> Post -> Build Event -> Command Line
FreeImage*d*.dll     to FreeImage.dll
FreeImage*d*.lib     to FreeImage.lib
FreeImagePlus*d*.dll to FreeImagePlus.dll
FreeImagePlus*d*.lib to FreeImagePlus.lib
Additionally, rename in project FreeImagePlus
Project -> Properties -> Configuration Properties -> Linker -> Input -> Additional Dependencies
from FreeImage*d*.lib to FreeImage.lib
Start the building process.
As a result, you should have the library files of FreeImage product in freeimage\Dist folder (FreeImage.dll and FreeImage.lib) and in freeimage\Wrapper\FreeImagePlus\dist folder (FreeImagePlus.dll and FreeImagePlus.lib).
If you have OpenCL SDK (one provided by Apple, AMD, NVIDIA, Intel, or other vendor) installed on your system, you should find OpenCL headers and libraries required for building OCCT inside that SDK.
Alternatively, you can use OpenCL ICD (Installable Client Driver) Loader provided by Khronos group. The following describes steps used to build OpenCL ICD Loader version 1.2.11.0.
 1.8.5
1.8.5